Top 3 Gifts For Nurses 2018

There is a wide range of options when it comes to buying the right gift for a nurse. A little bit of research can go a long way when finding that perfect gift!

Number 1

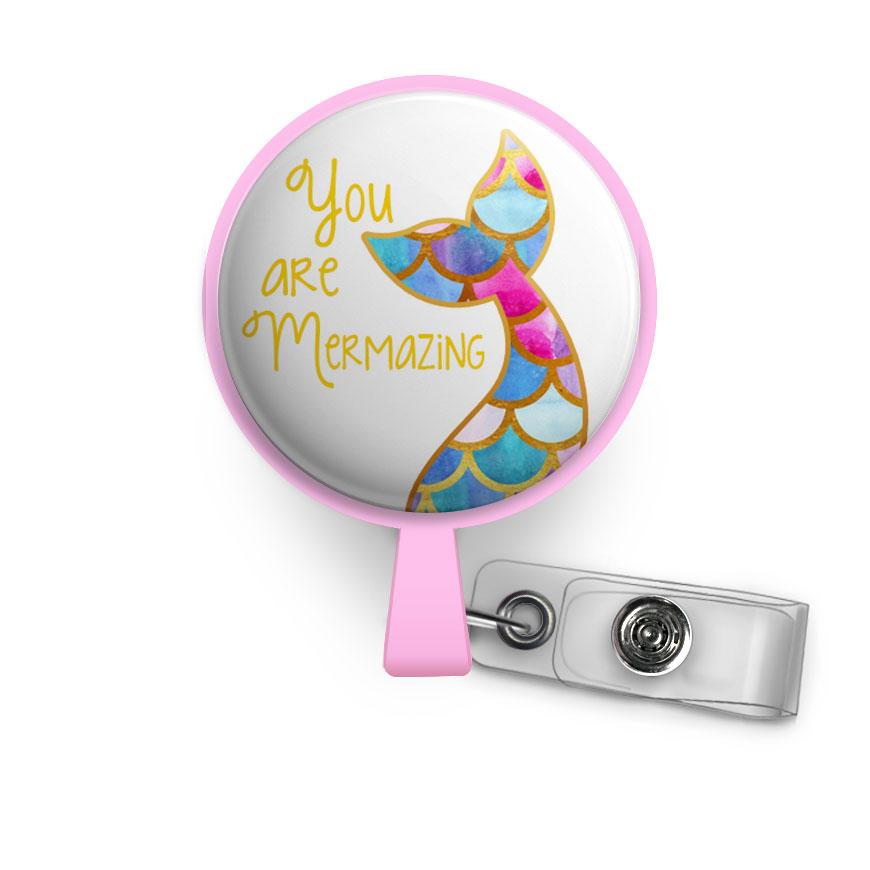
A personalized/custom ID badge reel


Nurses are very limited with what they can wear to show off their personality since they basically only get to wear scrubs.

Beyond The Scrubs has a very large collection of different ID badge reels on their store. What’s even better is that the designs are swappable! This way you only need one reel and you can change the design from day to day.  You will be able to give the perfect gift by selecting topper designs that are special to them!


Number 2

Personalized Stethoscope Tags

A personalized Stethoscope ID Tag is yet another good option from Beyond The Scrubs!

You can use the swap designs interchangeably between the badge reels and the stethoscope tags.

There is also an attachment point for adding cute charms!

Number 3

Funny Nurse Mug

Nurses love (and need) their coffee! What better gift than a mug that only medical professionals would understand?

Banana Plugs

There is lots of hot debate among home multimedia buffs on the subject of banana plugs and whether or not or not they are really worth investing in. For each and every newspaper write-up or web message board posting that praises them, you will find equally numerous that claim that they’re costly and do not give any benefits. Needlessly to say, a number of consumers are totally puzzled by this problem, so here is really a short summary of the primary positive factors and downsides to ensure that you are able to see each side of the subject, and help to make your personal mind up about whether or not you prefer to implement these plugs or not.

Banana plugs have a number of benefits: first of all, they produce a far better look to your home entertainment system. A lot of individuals really feel that bare cords really don’t look extremely pleasing, so a gold-plated banana plug stands out as the best approach of putting a little bit of style to a termination. An extra perk is the fact that banana plugs allow it to be incredibly basic to create connections, there is no reason to fumble around attempting to bond the speaker wire throughout the binding post, simply just push the banana plug into the jack and you’ll be set to go.

Sooner or later copper connectors are most likely to begin corroding, and this can bring about disturbance to become apparent within signal. Nevertheless, since almost all banana plugs are gold plated they’re entirely protected from corrosion, providing you with less troubles to concern yourself with.

Some customers believe that these kinds of plugs, or any sort of terminals for that matter, have an impact on the sound power, but this really is just not the truth. The signal transmission transported by audio cable are very low frequency and so any kind of distortions brought on by the banana plug on the ends of the wire is totally small; the vast majority of individuals wouldn’t have the ability to identify any discrepancy in sound efficiency by any means.

Banana plugs enable you to quickly and effortlessly make connections which are secure and guarded against corrosion, which paired the benefits above all appear to paint an exceptionally optimistic picture. Nevertheless, banana plugs may have some downsides.

A main problem at retailers is cost. Having a couple of banana plugs selling at around 10 dollars (even though it’s feasible to invest a lot more) the job of installing a plug on the termnation of every last speaker wire can soon accumulate, specifically if your program makes use of several speakers all with their own speaker wires. You might quickly wind up shelling out over one hundred dollars just on plugs, and for some consumers this price level simply isn’t able to be rationalized. On the other hand, should you buy online price tag just isn’t as much of a dilemma since they are available for much cheaper.

Another thing to keep in mind is an incorrectly installed plug might have an unfavourable result on audio performance. The challenge has been fixed with plugs that merely screw to the ends of the wires as opposed to having to be soldered in. Even so, anytime you bring in a connection you’re producing a possible weak-point for interference to be produced. When making use of bare wire there’s just one point which interference may be caused at and that’s between the end of the cable as well as the terminal; but when utilizing banana plugs you double this as interference can certainly enter between your end of the cable and also the at the end of the connect along with the terminal.

There’s no correct or entirely wrong answer to the question of whether or not you need to use these types of connectors, it is 1 of those problems that truly can depend on you.

Click Here to See Where I Get My Banana Plugs

The Simple Nature of Speaker Wire Versus Marketing Hype

Soon after getting pumped up about that pricey home theatre surround sound system you’ve just bought, it is not difficult to disregard the importance of the very element which joins the system together; the speaker wire. In addition, A great number of customers have no clue exactly what constitutes a great speaker cable. It’s also all too easy to fall for the over exaggerated boasts on several of the speaker cables found in retail stores.

They come across “testimonials” or rely on what the best buy salesman throws at him. And naturally, they end up forking out $600 for speaker wire and swear that the quality of sound is drastically better.

I suppose if I shelled out 100s or thousands dollars on speaker wire, I very well better persuade myself that I DO notice a noticable difference. Even though the science of electrical power very easily tells that it is phony.

The simple nature of Speaker Wire

The signal that stems from the amplifier and travels down the speaker wire to the speaker is merely just an electronic signal. For the greatest quality, all you should worry about is that the resistance and capacitance is in line, and that the wire is a sufficient gauge (thickness). Anything else won’t have an effect on sound quality, therefore not really important.

With the many various brands of speaker cable available to buy, it may be confusing on which to choose. The prices also usually differ a great deal from each other depending on the brand and marketing. So what on earth is the better bargain? The less expensive one or the more expensive one?

Picking out which is the better speaker wire for your audio system may be difficult since there is a good amount of falsehoods being spread around about these cables. You must not invest in speaker wire because it’s more pricey. Make your decision on whether the cable is high quality, rather than high priced. Many wires in shops are actually drastically marked up in cost, so use caution.

Follow these suggestions to be sure that you make the right choice in speaker wire.

You should know that the thicker the speaker wire, the lesser degree of resistance. You ought to definitely choose a speaker cable that’s a lower gauge. The longer you are going to run the cable, the thicker the wire you need to get. My suggestion is to look here once you have figured out the length.

Are Banana Plugs Necessary?

For additional comfort, you can decide to put banana plugs on the ends of the wire. This makes it quicker and easier to connect and unplug the wires as required. Banana plugs are not going to have an impact on quality of sound at all. Banana plugs are a good idea if you want to have a professional looking installation and added convenience. Speaker wires is what can bring your system together for great sound quality.

Tags: , , , , , , , , , ,

HDMI Selector Switches – Multiple Devices to Single Display

You should get an HDMI switch if you’d like a hassle free way to connect several HDMI source devices one input in your HD TV. HDMI Switches are also referred to as HDMI Switchers, HDMI repeaters, or HDMI selectors. In case your Television only has one or two HDMI ports, then not a problem. Simply use an HDMI switcher and effortlessly swap between multiple HDMI sources by pressing a button. There is no longer a need for unplugging and plugging in so that you can switch between different devices.

Hook up a number of different HDMI sources to your TV at the same time. Even when your Tv only has just one HDMI port. Amongst many of the HDMI sources you can connect are:

HDMI Cable or satellite digital tuners, DVD players with HDMI, Blu-ray players, computer systems with HDMI, Xbox 360, PS3s, HTPC, Media players, High Def video cameras, etc. Any system that you own that features an HDMI output you can hook up simultaneously with an HDMI switch, providing you have at least 1 HDMI input on your Tv.

Listed below are essential things to contemplate before making the purchase of an HDMI switch.

1. What Number Of Ports Do You Need

As an example, a 2×1 HDMI switch has 2 ports that you can plug 2 different HDMI sources to switch between. A 5×1 HDMI switch has 5 different ports and can switch between as much as 5 seperate HDMI source devices.

A 50 Port HDMI switch seems great, but it is pretty useless if you don’t have 50 source devices to work with with it. The best HDMI switch would be the one that will fit all of the source devices you will ever need.

It appears like the most chosen HDMI switch stands out as the 3×1 because people find it a great value plus they just have 3 HDMI source devices to use.

2. Check to be sure it supports Dolby True-HD and DTS-HD Master Audio. Have a look at the specs for the HDMI switch to make sure it supports resolutions of up to 1080p. This includes regular video resolutions like 480i along with HD resolutions like 480p, 720i, 720p, 1080i and 1080presolutions.

You want support for these resolutions since they are the most common used today in just about every type of media.

Right now there are also a few advancements to HDMI switches you may be interested in .

3. Just how is an automatic switch better compared to the manual HDMI switcher ?

Automatic HDMI switchers will choose the source device which you power on automatically. But what if you have more than 1 source device turned on simutaneously? In such cases, it will select the last device switched on. For instance, if you have 3 switched on and you choose to switch on a 4th device it will instantly switch to the 4th one. After that you can press the button on the remote or the switch to to alternate between your devices.

Manual switching

When you have a couple of devices powered on all the time, then manual switching is really a better option to use.

HDMI switchers are all capable of manual switching which can be easily done by simply pushing a control button to switch to different sources.

4. Is an HDMI 1.3b Switch Up To Scratch?

Yes, virtually all HDMI devices available just have features from HDMI version 1.3b and earlier.

Although HDMI 1.4 has been released for over a year, there is still just very few products which support the new standard. Therefore, there aren’t any HDMI switches available on the market that have support for 1.4 at present, but there’ll be switches which support it soon so keep an eye out.

Thus a great HDMI switcher should have the right number of ports you will need, have many digital audio and video formats, automatic and manual switching abilities, and must support a minimum of HDMI 1.3b .

If the HDMI switch you are looking at delivers these characteristics, then you will make a excellent choice.

Click here to see where I get my HDMI switches / Selectors

Long HDMI Cables – How Do They Compare?

One of the drawbacks of an HDMI cable is that they are not the best for long cable runs. Nonetheless, There are places that sell an efficient long HDMI cable (40ft and longer) that have been able to pass a 1080p signal in lab tests, one of which you can find here. In some circumstances, an equalizer was needed. I will provide you with the link to the location to get them at the end of this post.

So it is worth a shot, but outcomes will differ depending on the equipment becoming used. Not all pairs of devices are in a position to pass the signal over longer cable runs.

The maximum length of cable that may be effectively employed varies depending on each individual cable, as well as the quality specs of the manufacturer. You will find 100ft thick wire gauge cables accessible with out a signal booster that some folks find to work well with their eqipment. Nonetheless, the only method to find out if they’ll work for you would be to attempt it your self.

So just how do you know if you have an HDMI cable that’s too lengthy? If there’s any problem with your HDMI cable, the signs will probably be really obvious. In most cases, you won’t get any picture at all as well as the screen will probably be blank. Otherwise, the image may flicker, or the pixels could drop out. In some instances you could only get sound to work with your gear. If any one of these difficulties occur together with your system, then the electronic signal transmission from your HDMI cable just isn’t strong enough.. What you can do at this point is either get a shorter HDMI cable, attempt a different cable with similar length and hope it works, or try a signal booster. Obviously, if at all possible, try out a smaller cable.

You can find equalizers produced for HDMI cables that can aid maintain the signal strength and high quality throughout the whole length of the lengthy HDMI cable. Some other titles for signal equalizers are signal enhancer and signal boosters, given that they improve the signal and cleans up interference. The actual image quality like color, and resolution just isn’t affected as a result of such devices.

It’s also possible to lengthen an HDMI cable run with the use of an HDMI extender over CAT5e or Cat6 cabling. These devices can extend the length of an HDMI cable run as much as 100 to 160 feet. They can also sustain a 1080p signal all through the run too as Support for DDC & HDCP.

Many people are now learning that HDMI is an “all or absolutely nothing” technology. Digital signals like HDMI will either have perfect video being displayed or a blank screen (defective cable). There’s no degradation of image quality like analog cabling. If your HDMI cable is not sending out a strong enough signal, you’ll get distinct video issues like distortion, flickering, or possibly a black screen. So give some of these options a attempt and you will probably get good results.

Tags: , , , ,

LCD TV Wall Mount Bracket – Mounting a TV Tutorial

Need to find out the easiest methods to install that stunning television to the wall using a TV Wall Mount? I will give you all of the information you need in order to accomplish this. Why should you think about mounting your TV? Looks great, takes up less room, and also the pride of knowing you mounted your television yourself. Also, by doing it yourself, you will save the money it costs to have a professional do it. Ask a friend for help instead and you will see exactly how easy of a task it can be. Just make sure you follow the steps correctly. It’s not a very good idea to take on the project all by yourself just because it can be hard to lift the display and you might need some help with the drilling while you are putting on the wall mount. You will be surprised how quickly the job can be done if you don’t run into any problems and you will be happy you chose do it on your own.

Types of Wall Mounts
There are many different types of mounts you can choose for the job. Ranging from those that hold the TV very flush on the wall, but offer no way of adjustment, to very advanced mechanized mounts which can be very flexible and will move side to side and up or down. You should order a mount that is of top quality, but not too overpriced. Many retail stores raise the prices on their mounts. I will give you a hint on where I buy my mounts and for my installs at the conclusion of this post. There is a nice selection of mounts that can be found online here: www.cabletrain.com/wall-mounts

What Does VESA Mean?
In general, wall mounts are manufactured to be VESA compliant. In other words, as long as both your TV and the wall mount are VESA compliant, they will work together. Just make sure you choose the right size mount for your TV. The mount should state what size TV it really is made for and how much weight it can handle.

Tools Required
You should already have the tools you need to install the mount. A tape measurer, power drill, screw driver are all you really need. However, a stud finder will definitely make your life easier. Another useful tool would be a level to make sure you don’t have it crooked.

Step-By-Step Installation Walkthrough

    1. There is much debate over what the proper height is to hang a TV on the wall. My advice is to cut out some cardboard the dimensions of your television, and have a friend maneuver it around around the wall until you get a rough notion of where you want to place the mount. Once you’re finished debating on the best place to mount your TV, you need to find the studs. In most homes studs can be found 16 inches apart. Normally 2 studs will be enough to mount a TV securely to the wall. However, If you have a larger TV you might want to use 3 studs. You should use a stud finder if you can. They can be found at any hardware store for around 20 dollars. Stud finders will leave you with no doub’t that you are about to drill into the stud. I have drilled many missed holes in the wall without one. All you do with a stud finder is guide it over the wall while pressing a button. It will make a beeping sound automatically once it finds a stud. Then you can mark the spot with a pen or pencil. If you don’t have a stud finder handy, you can measure 16 in. from the electrical outlet or door frame to manually locate it.


    1. For the next step, I usually screw in the top middle hole on the bracket to the wall. By doing this, you can easily adjust the level to make sure it is looking straight. After you’re done screwing in the bracket to the wall, it is time to find the right sized bolts to fit the back of your TV. Most mounts come with a variety of bolt sizes for you to find the right size bolt for your TV. Once you find the correct bolt for your TV, you attach the mount to the display.


  1. Now you should have the bracket installed on the wall, and the TV attached to the mount. I usually have a plate hole ready near or in the bracket for your cables to run through the wall for the TV. You’re almost done! Just place the mounted TV to the bolted bracket on the wall to finish the project.

Tags: , , ,

HDMI Splitter – Splitting Source Device to Multiple Displays

Wish to use one HDMI source to multiple displays? A good HDMI Splitter could just be the right remedy for your needs. They will support all different varieties of HDMI source systems which include Xbox 360 elite, cable set tops, Dvd players, Bluray players, and so forth. HDMI splitters allow for flawless digital audio and video signal transmission; no signal loss what so ever. An extra benefit, is the unsightly wire chaos is often decreased, saving a lot more living space, considering that just one cable will work great. A good number of them can support resolutions of 480p, 720p, 1080i, and 1080p. This kind of device can deliver the results along with HDMI and DVI simply because DVI is essentially exactly the same transmission as HDMI, simply a different connection (Take note: DVI can’t carry sound).

The installation of the splitter happens to be quite simple and easy and it also doesn’t need any kind of software program or additional gear with the exception of digital HDMI cables. Like several equipment nowadays, this device too functions within the connect and play process.To utilize this product, you just need to connect the HDMI source device to the splitter input using any HDMI cable. The amount of outputs will be dependant on the type of splitter you buy. Offered in several versions such as 1×2, 1×4, and matrix combinations like 2×2, 2×8 and 4×4, larger volume of outputs can be carried out through daisy chaining these splitters. The most up-to-date models will give you a higher compatibilty and also are a great deal more dependable.

You can even effortlessly change between the sources by switching inputs. You can use a remote to operate the splitter or by pressing the buttons on the front. The LED lights on the front panel will let you know which inputs are activated. As small as these units are, they are able to transmit uncompressed digital data, buffer, and then amplify the outputs.

HDMI splitters are becoming more and more popular for people wanting to use a single source device to 2 or more different rooms. They guarantee an easy way to connect a single HDMI source to 2 or more compatible displays. To guarantee compatibility, it helps if all of the displays can display the same resolutions. or you may run into some problems.

Excellent for businesses, classrooms, gaming venues, control rooms, home theaters, and more. HDMI Splitters are the latest in digital audio and video technology.

How are HDMI splitters and HDMI switches Different?

1x2 HDMI splitter 
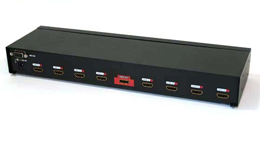
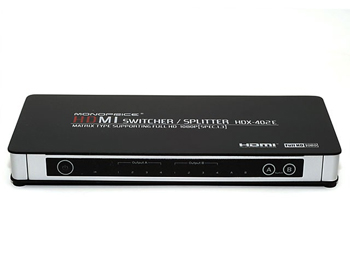
Splitters are essentially complete opposites from switches. They are capable of the same matrixes, but an HDMI switch is able to use multiple source devices to one display. This is the ideal solution for those who lack the amount of HDMI inputs they need to use on one TV. It is possible to use up to 8 different HDMI sources to 1 HDTV with some HDMI switches. Obviously, you now know that an HDMI splitter can multiply a single HDMI source to multiple displays. Currently, HDMI switches are not as heavy on the wallet as HDMI splitters. HDMI splitters cost more because the technology used is more advanced. Nevertheless, both types of digital devices are well worth the buy in order to suit your needs.

HDMI Wall Plate – Benefits of Having One?

HDMI Wall plate is fantastic to own for any home entertainment room. They are usually used for setting up HDMI wires inside the wall structure and for long cable runs. Many people buy them to clean up messy wires and run cables through the wall for that professional look.

But why is it really important to have an HDMI wall plate?

It is a incredibly helpful addition to a home entertainment since it will help you to conceal long hdmi cables in the wall and only have shorter wires exposed.

They conveniently make interior planning a lot nicer, even though it is only a minor addition, it still helps. It’s always great to remove wire clutter when you can so your home theater looks clean and professional. Just about all of your products such as DVD player, xbox 360, PS3 , sound reciever, all promote cable mess. That’s the reason many people are choosing to purchase wall plates for everything today. Everything adds up and we will have way too much cables without the help of wall plates. The sloppy and untidy look it creates could make an entire space look unsightly.

You may use your HDMI Wall plate for a number of different reasons. For example, many people choose to route an HDMI cable from a DVD player from a different room through the wall, and into the Hdtv.

You will also have to choose between a single port HDMI wall plate, or a dual port.

The majority of HDMI Wall plates also support the most recent versions of HDMI so that you are future proof for any popular new HDMI devices that may enter the market.

Single or Dual port HDMI? – Certainly go for the dual if you don’t mind the price difference. Any kind of HDTV you buy today will have at lease 2 HDMI ports so you should also think about that. An alternative solution would be to use an HDMI switch for more HDMI sources. Besides, you never know when you might need an extra HDMI port. Both dual and single wall plates can be found at this site.

Certainly perform a search on the internet for buying HDMI Wall plates. The prices in retail stores will likely be much higher if you think about the price differences between HDMI cables already. There are many online home theater stores that sell a number of wall plates, including HDMI. On a side note, HDMI wall plates can be purchased in local store as well.

HDMI Wall plates are made of plastic so keep that in mind. Something plastic is breakable, including these devices. Though duct tape or electrical tape can always do the trick. As far as the actual functionality of the HDMI wall plate itself, it will do it’s job. You can be picky on the design, but the actual audio and video quality will be the same across the board.

The set up is also super easy. If you are knowledgeable about installing any type of wall plate in your home, this is no different. Despite the fact that the install is easy, you should make sure the screws are holding the wall plate securely.

They can easily break being that they are plastic. I have experienced a case where someone pulled the plate away from the wall and it broke.

If you are like many, and have a mess of wires hanging everywhere, you should definitely buy an hdmi wall plate and any other wall plate you might need. It won’t cost you a lot (about 20 bucks for a decent quality one).

Some HDMI Wall plates have a status light so that you can verify that the connection is there. As long as you carefully install everything, you shouldn’t have anything to worry about.

If you would like to buy an HDMI Wall Plate, Click here.

Tags: , , ,

HDMI Cable – What to Know Before Buying

When you find yourself in the market for a digital HDMI Cable there are several factors you might bear in mind when diving into a purchase. Do you think you’re running the cable in the wall? Is a CL2 rated cable really important whenever setting up a cable into the wall? Precisely what gauge cable do you need? What length of a cable is appropriate? How much is simply too much to spend? These factors can be quite a little overwhelming for some individuals. Hopefully this article will clear a few things up for people looking for a digital HDMI cable to hook up their elegant home theater. Once you know what you need, a good place to get them is at cabletrain.com.

Using a Digital HDMI Cable in the Wall

If you’re planning on running the HDMI cable through the wall, you’ll need a cable that’s CL2 rated. building code inspectors assert it really is needed to avoid potential fires. Other people will say that it’s not necessarily that huge of a deal if your cable isn’t in-wall rated. However, I would suggest an in-wall HDMI cable simply because it’sthe way it’s supposed to be. It could be needed considering if you are intending on selling your property later on, you should have a CL2 rated cable to pass the inspection. Therefore of course, it is actually most definitely highly recommended to dish over a bit of more money for a CL2 In-Wall rated HDMI cable if you are planning on an in wall installment.

Precisely what gauge cable should I get?

The standard for wire thickness is recognized as the American Wire Gauge (AWG). Usually for digital HDMI cables, you will see 28AWG, 24AWG, and 22AWG cables. From these types of three gauges, the 22AWG cable is the thickest one. Chances are you’ll ask, what gauge do I have to have? Well this will depend on how long you plan on running the cable. If all you need is a 6 foot HDMI cable, or maybe a 10 foot, the cheaper 28awg cable will work flawlessly in your case. On the other hand, if your thinking of running a long HDMI cable, you’ll want the thicker 24awg or 22awg cable. This can be sure to preserve a stronger transmission throughout the length of the cable.

Please note that it’s a smart idea to test your longer HDMI cables before running them in the wall.

Just how much is simply too much to shell out on a HDMI cable

Simply put, opt for the least expensive one. Lots of people wind up expending far too much for HDMI cables when it doesn’t make a bit of difference in quality. Simply because all it takes to get that high-definition picture is a bunch of 1′s and 0′s. Less expensive HDMI cables perform very good in transmitting the 1′s and 0′s therefore why should you throw away your hard earned money on overpriced cables? Of course, you’ll still need to give some thought to what was stated earlier concerning cable thickness and the length of the cable.

Tags: ,

LCD TV Wall Mount Bracket – How to Mount Your Television

flat panel tv wall mount At this time I will explain to you the way to install a Flat screen tv or Lcd Display utilizing a flat screen TV wall mounts. Thinking about contemplate mounting your Flat Screen TV? Looks great, uses up less room, plus the ego from recognizing you installed your Flat Screen TV by yourself. You can also save a lot of money by installing the mount yourself instead of hiring someone else to do it. If you get some help from a friend, it is not a difficult task if you follow the steps correctly. You don’t want to do something like this on your own just because it is hard to lift the display and perform some of the drilling while you’re attaching the mount. But besides that, it actually doesnt require a lot of time but you’ll be happy carrying it out by yourself by the end of the day.

Types of TV Wall Mounts
There’s a wide variety of mounts to select from. The kinds of mounts offered include: low profile mounts (very near to the wall), tilting (not necessarily as close, but may be adjusted upward or down), and tilting and swivel wall mounts (extremely versatile) When selecting a mount it will always be recommended that you select a reputable business which has very good reviews from their customers. At the conclusion of the article, I am going to give a link to the site I purchase my tv wall mounts.

VESA explained
The majority of wall mounts you can get today are VESA compliant This means that they will be suited with your Lcd tv as long as they are VESA compliant and you’ve got the correct size wall mount for your television. The mount should state what size TV it really is made for and the way much weight it could handle.

What types of Tools are Required?
Usually the standard tools are essential to install a tv wall mount. For my installs, I personally use a power drill, tape measurer, screw driver, and stud finder. An additional helpful tool would be a level to make sure you don’t have it uneven.

Step-by-step Installation Guide
There’s some discussion over exactly what the appropriate height is to hang a TV on the wall. Make an effort to to cut out a piece of cardboard the dimensions of your television, and also have a friend move it around on the wall until you get a approximate notion of the spot where you wish to position the TV Wall Mount. When you’re done debating on the best place to attach your TV, you have to locate the studs. The standard for studs in most homes is 16 inches apart. Typically 2 studs will be sufficient to mount a TV safely to your wall. Having said that, If you have a heavier TV you may want to use 3 studs. I personally use a stud finder which I bought for around 20 bucks from my neighborhood home improvement center. Utilizing a stud finder can make your life much easier. You simply press the button on the stud finder and guide it along the wall. It will make a beeping sound automatically once it finds a stud. Then you can simply mark the spot using a pen or pencil. Without a stud finder, you are able to measure 16 inches from a door frame or an electrical socket.

For the next step, I normally screw in the top center hole on the bracket to the wall. This should help you be able to easily level the mount prior to screwing the remaining holes of the mount to the studs.Then all you need to do is choose the right bolts to match the holes around the back of the display. Nearly all mounts you can get today, can come with plenty of sizes of bolts so you have a match for the display. Then you’ll attach the mount to the TV.

So now the bracket is bolted to the wall, and the mount is bolted to the flat panel TV. If you’d like to make sure your install is as clean as possible, you’ll want to cut out an opening in the wall nearby the bracket for your wires to hide in the wall. You’re almost finished! Just place the mounted TV to your bolted bracket on the wall to finish the project.

If you’d like to know the reliable site that I buy my wall mounts from Click Here.